- Part 1: Getting Started.
- Part 2: How Figma Plugins Work.
- Part 3: Wiring Things Up
- Part 4: Working with Colours
- Part 5: Working with the UI.
- Part 6: Polishing Things Up. 👈 You are here
** The code for this section is *here.***
Okay so we have done a lot of work but our plugin still looks like 🔥 hot trash™ and is missing some reactiveness.
🖼 The Design
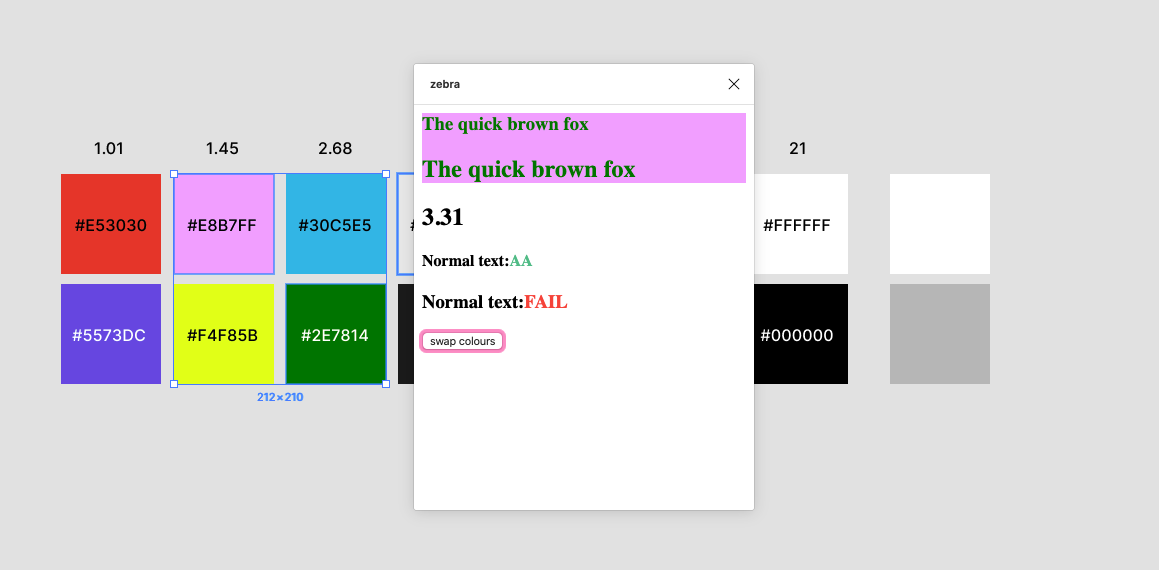
Luckily for us we have a design we want to get to:
Looking at the final design we can see that there are a few things we are going to need to do every time the selection changes:
- Change element colours.
- Change text values.
♻️ Changing Text Values
So we are going to start off by writing some functions in ui.html that will prevent this from becoming very repetitive. Inside <script/> write the following:
function changeText(id, text) {
  const element = document.getElementById(id)
  element.textContent = text
  return element
}
This 👆takes two parameters: an id to find the right html element and the text we want to replace it with. So we can use it to replace text content like this:
window.onmessage = async event => {
  const message = event.data.pluginMessage
  if (message.type === 'selectionChange') {
    // this 👇
    const contrast = document.getElementById('contrast')
    contrast.textContent = message.contrast
    // becomes this 👇
    changeText('contrast', message.contrast)
  }
}
Nice and clean.
♻️ Changing Element Colours
Now we can do the same for changing an element’s colour, with a few differences.
Firstly, because we want to change more than one element at a time we are going to use classes and not ids.
Secondly, because we are changing both p and div elements we need to check what kind of element it is before changing the colour:
function changeColor(classname, color) {
  const elements = document.getElementsByClassName(classname)
  for (let i = 0; i < elements.length; i++) {
    if (elements[i].localName === 'div') {
      elements[i].style = `background-color: ${color};`
    } else {
      elements[i].style = `color: ${color};`
    }
  }
}
We fetch a list of all elements with a specific class name and loop through that list checking each element’s type. If it’s a div we use background-color: instead of color: to prevent changing the wrong thing.
Notice how we use a for loop to iterate through elements? That’s because getElementsByClassName() does not return an array but instead returns an “array-like” list that doesn’t have array methods like .map().
Use the changeColor() function like this to easily change the colour of multiple elements at once:
<div id="background" class="background-color">
  <h3 class="foreground-color">The quick brown fox</h3>
  <h2 class="foreground-color">The quick brown fox</h2>
</div>
<script>
// ...
    changeColor('background-color', message.background)
    changeColor('foreground-color', message.foreground)
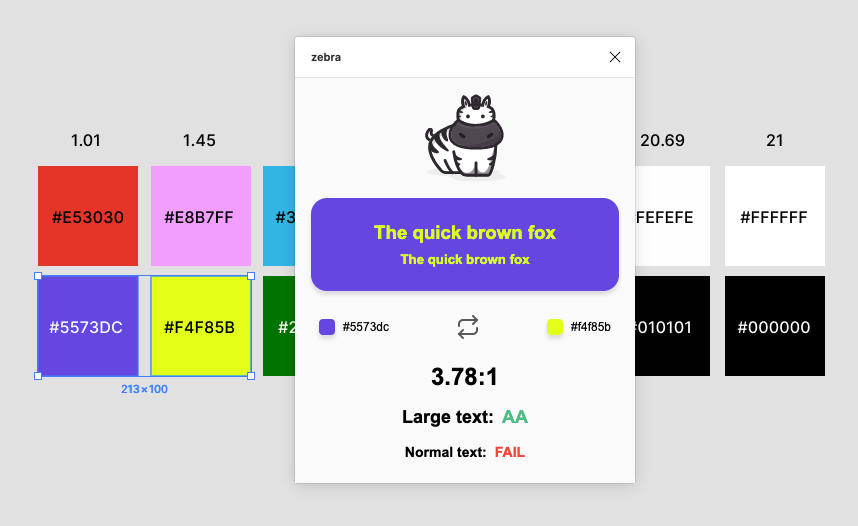
We should see something like this if everything goes well:
💯 Updating Scores
The scores are tricky because when we update them we need to change both their colour and their text content and we have to do it in two places at once. We’re going to write some CSS classes to handle the colour of the different scores. We can just write them inside <style/> like so:
<style>
  .FAIL {
    color: #f34242;
  }
  .AA {
    color: #6bbe96;
  }
  .AAA {
    color: #00da71;
  }
</style>
<!-- ... -->
<h4>Normal text:<span id="largeTextScore"></span></h4>
<h3>Normal text:<span id="normalTextScore"></span></h3>
Then with a custom function we can handle changing their className and text content at the same time:
function updateScores(id, score) {
  const element = document.getElementById(id)
  element.className = score
  element.textContent = score
  return element
}
//...
updateScores('normalTextScore', message.scores.normalText)
updateScores('largeTextScore', message.scores.largeText)
Before we test it, hop over to code.js and alter the figma.showUI() call so that it spawns a larger window:
figma.showUI(html, { width: 340, height: 405 })
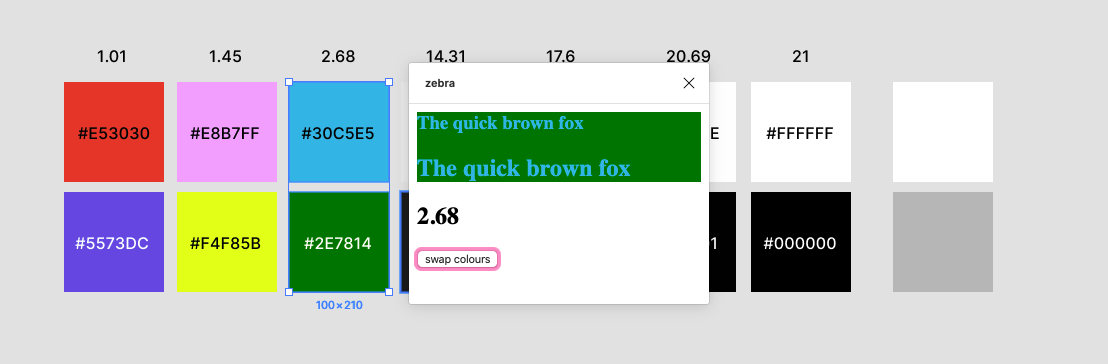
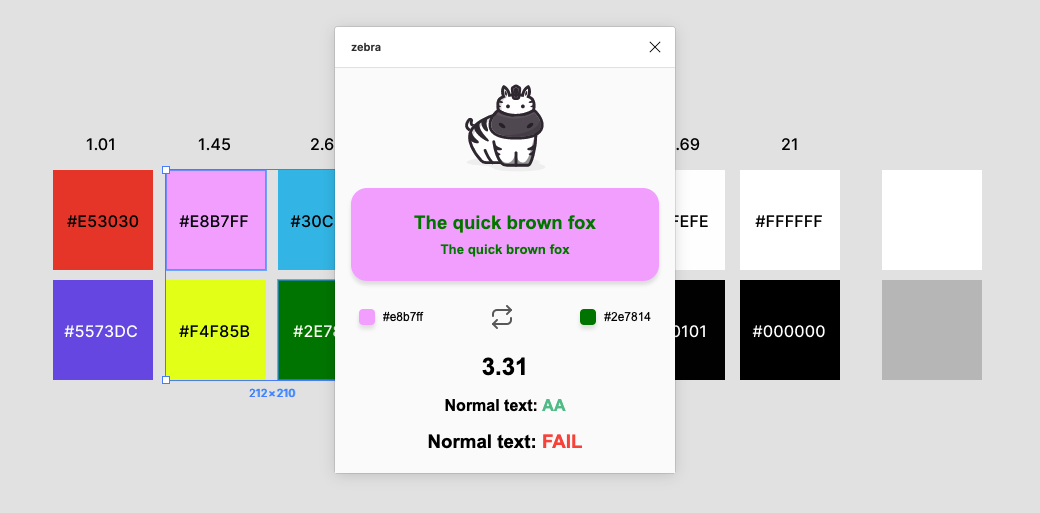
And now we should see this when testing the plugin:
That’s basically everything we needed 🎉.
Yes, it still looks like 🔥hot trash™️. If you want to style the UI on your own you can totally do that from here. If you want to just copy my html and css you can find it here. In my version I added a few more changing elements like the colour blocks with hex values:
If you want you can easily stop here. The code for the final plugin is here.
🌯 Bundling with Webpack
If you did copy the HTML and CSS from the ui.html in that step, you will see that we have everything in one 200+ line file. All our CSS is in <style/>, all our JS is in <script/> and all our SVGs are inline in the HTML. This makes it difficult to read and if our plugin were a bit more complicated it would be a real problem.
The bummer is if we wanted to split things up into their own files it won’t just work™. What we need to do is use something called a bundler. All this does is take all our separate files, code.js, ui.html, ui.css, and bundle them into one JS file and one HTML file that Figma can read. That way we can split our code up any way we want in development.
The Figma docs have a step-by-step guide to doing this so if you want to split things up I recommend following it.
💎 Smoothing Rough Edges
There were a few cases where the plugin wasn’t a super great experience.
- Without a selection the plugin is blank.
- If the user selects less than two layers the plugin doesn’t respond. This is not a big deal but I think it feels a little broken so I wanted to handle this by doing a contrast check with white in this case.
- If the selected layers don’t have any fills in them then the plugin throws an error. I want to catch that error and present a more useful message.
So that the plugin isn’t blank when a user starts it up I decided to assign some default values to our global variables, and then call calculateAndSendContrast() on plugin start:
let foregroundColor = [0, 0, 0] // black
let backgoundColor = [255, 255, 255] // white
let foregroundAlpha = 1
let backgroundAlpha = 1
// call on plugin start
figma.showUI(html, { width: 340, height: 405 })
calculateAndSendContrast(foregroundColor, foregroundAlpha, backgoundColor)
This way the plugin starts up with white as the background and black as the foreground.
To handle only one layer being selected I extracted the filtering we do on the selected layers into its own function and added a notify event if it returns nothing:
function findFills(nodes) {
  const nodesWithFills = nodes.filter(
    node =>
      node.fills && node.fills.length > 0 && node.fills[0].type === 'SOLID'
  )
  if (nodesWithFills.length <= 0) {
    return figma.notify('Please select a layer that has a solid fill', {
      timeout: 1000,
    })
  }
  const fills = nodesWithFills.map(node => node.fills[0])
  return fills
}
And then when selection changes I only check if there are actually any fills in the selection:
figma.on('selectionchange', () => {
  const fills = findFills(figma.currentPage.selection)
  if (fills.length > 1) {
    // ...
  }
  if (fills.length === 1) {
    const fills = findFills(figma.currentPage.selection)
    foregroundColor = getRGB(fills[0].color)
    foregroundAlpha = fills[0].opacity
    calculateAndSendContrast(foregroundColor, foregroundAlpha, backgoundColor)
  }
})
If there is only one fill I do a comparison with the previous backgroundColor value which is initially white.
And I think that’s about it. 🎉
As always the code for this plugin is here split up into steps so it is easier to follow. If you notice any issues please create an issue on the repo or better yet make a PR 😎
🙏 Credits:
- 🙌 A lot of the code for checking colour contrast came from the brilliant repo for contrast-ratio.com.
- 👊 Tanya Hirst made the dope illustration of a zebra. You can check out her dribbble here.
- 😍 The Figma team and their brilliant tool and their brilliant docs . A lot of the explanations were stolen from their docs site.
- ❤️ Everyone on the Figma plugin slack . Searching through past issues helped a lot.