- Part 1: Getting Started.
- Part 2: How Figma Plugins Work. 👈 You are here
- Part 3: Wiring Things Up
- Part 4: Working with Colours
- Part 5: Working with the UI.
- Part 6: Polishing Things Up.
Before we can really go any further we should understand how Figma plugins actually run. Understanding the basic architecture will make the code we are about to write make more sense.
Much of this is summarised from Figma’s own documentation, which is tremendous, so if you prefer you can read that here.
Also feel free to skip to the next part if you don’t care!
⏳ The Sandbox
A plugin runs in a sandbox inside of Figma, isolated from the rest of the application and this has some interesting consequences:
- Access to the Figma document is exposed through a
figmainstance in this sandbox. So every time we want to use or manipulate something from the document we call a method or dig into thefigmainstance. For example, getting the current selection looks something like this:
const selection = figma.currentPage.selection[0]
- Because the plugin code runs in a sandbox and not in the browser itself (remember even the desktop app is just a browser underneath) we have access to all the latest javascript goodness. It supports ES6 libraries without us having to compile them. No babel 🎉
- For the same reason, we don’t have access to the browser APIs. This is tricky because we can’t use things like
fetch()to get data in the sandbox. The solution to this problem is what defines the architecture of a plugin. Anytime we need access to the browser APIs we have to launch aniframeand send messages to it.
Aniframeis essentially a mini HTML document inside another HTML document but we can think of it like our own little browser window. We can send messages between our sandbox and ouriframeto pass data between them.
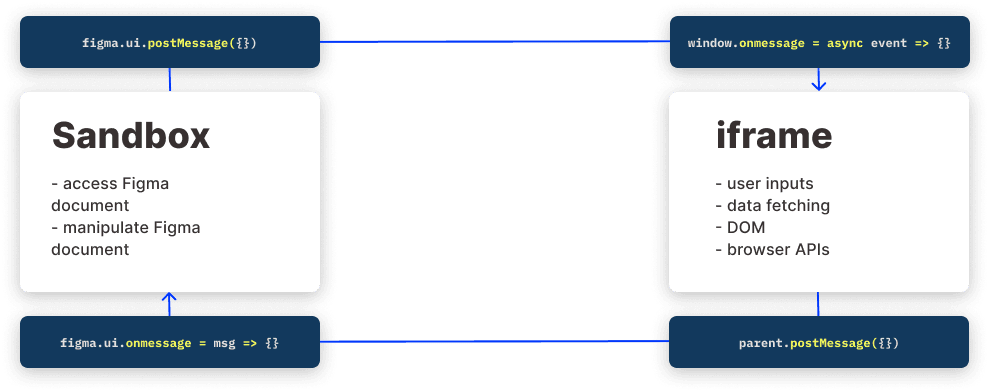
The iframe can be visible, for plugins that have a user interface, or invisible. This means you can still have access to the browser APIs even if you don’t want the user to interact with anything.
📄 The Figma Document
The Figma document is represented as a node tree. What does that mean? Well a tree is a type of data structure that looks like this:
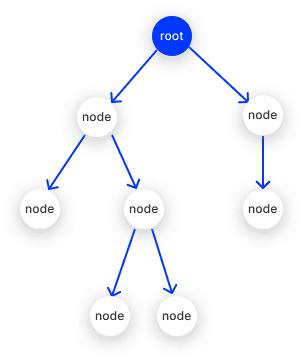
There is a root node that contains children nodes. Those children can then in turn have their own children and so on. In Figma, the root node is the document and every layer is a child. That means the above tree would look like this in the layers panel:
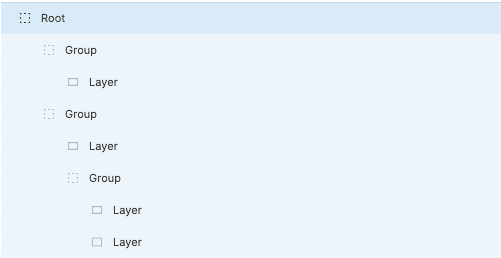
Notice how things we think of as just being empty containers, like Groups and Frames, are nodes themselves.
🕸 Node Types
Each node in this tree has a type property ie: RECTANGLE, TEXT, GROUP. These types map pretty well to how we think about layers when using Figma. A node’s type dictates what properties it can have. There are properties that are common to all types but there are some properties that are unique to a certain type.
For example: a FRAME type can have a property called .constraints but a node of type RECTANGLE can’t. It’s important to understand this because we need to make our plugins work even if the user selects a node type that we didn’t expect.
We can see a list of all the node types here as well as comprehensive documentation on what properties each type can have.
🕵️♀️ Finding the Right Node
Most plugins can be divided into two behaviours:
- Alters currently selected nodes.
- Goes through all the nodes and alters ones that meet some criteria.
The first case is fairly straight forward. The figma instance has a currentPage property (each page has it’s own selection) and the currentPage has a selection property ie: figma.currentPage.selection. This returns an array of the currently selected elements.
The second case can be trickier because we need to loop through the document structure to find nodes that match our criteria. Luckily there are some helpful methods for finding nodes:
findOne(): Finds the first node that passes the test given as an argument.:findAll(): Finds all the nodes that pass the test given as an argument
// returns the first text element
const node = figma.root.findOne(node => node.type === 'TEXT')
// returns an array of text elements
const node = figma.root.findAll(node => node.type === 'TEXT')
Note: it’s not always wise to check the entire document as it could be huge.
In both cases we need to make sure we prepare for the possibility that there will be no nodes to work with or more nodes than we anticipated.
📝 Editing a Node
Okay, so now we have the nodes we want to edit, how do we make the changes? Well for the most part it’s pretty simple. We just assign a new value to the property:
const node = figma.root.findOne(node => node.type === 'TEXT')
node.textAlignHorizontal = 'RIGHT'
Boom, done 🎉.
This works for simple properties but a lot of properties are objects or arrays. For instance the .fills property contains an array of the fills on a particular node. When we change these we need to make a copy of the original array, alter it and then assign it.
🆘 Bad:
const node = figma.root.findOne(node => node.type === 'TEXT')
// this assumes we know fills has at least one item
node.fills[0].opacity = 0.5
✅ Good:
const node = figma.root.findOne(node => node.type === "TEXT")
// this assumes we know fills has at least one item
const fills = node.fills
fills.[0].opacity = 0.5
node.fills = fills
There are some interesting technical reasons why it works this way, which you can read about here, but for our purposes we don’t need to know. We only need to remember to always make a copy of the array/object and alter that copy.
Enough waffling, let’s write some plugin code 🎉: Part 3: Wiring Things Up