- Part 1: Getting Started.
- Part 2: How Figma Plugins Work.
- Part 3: Wiring Things Up
- Part 4: Working with Colours 👈 You are here
- Part 5: Working with the UI.
- Part 6: Polishing Things Up.
The code for this section is here.
Now we have the outline of our plugin we need to fill in the gaps.
🚦Getting an “un-normal” RGB Value
Before we can really get cracking we need to do some house keeping. You have probably noticed that Figma stores colours in objects like so:
{ "r": 0.8999999761581421, "g": 0.1875, "b": 0.1875 }
The channel values have been normalised to be between 0 and 1. To prevent some headaches we would prefer to work with the channels in the more common 0-255 range. To do this we can write a function that converts them back:
function getRGB({ r, g, b }) {
  const rgbColorArray = [r, g, b].map(channel => Math.round(channel * 255))
  return rgbColorArray
}
We are destructuring the object into r, g, and b and putting it into an array. We then loop through the array and multiply each value by 255 and round it to the nearest integer. We do this to prevent weird decimal points in our RGB values like: rgb(255, 171.5, 255).
Now we can store these “normalised” values in some global variables at the top of code.js when ever selection changes. This way we always have the currently selected foreground and background colours available and can pass them as arguments where needed:
let foregroundColor
let backgoundColor
// ...
// inside selection listener
const fills = selection.map(node => node.fills[0])
foregroundColor = getRGB(fills[0].color)
backgoundColor = getRGB(fills[1].color)
const contrast = calculateContrast(foregroundColor, backgoundColor)
sendContrastInfo(contrast, foregroundColor, backgoundColor)
Alright, now we can get on to the hard stuff.
🧮 Calculating Luminance
To make our contrast function actually work we need to write a function that gets the relative luminance of a colour. This is probably the most complicated part of the process but it is essentially just a formula that you can find here.
function calculateLuminance(color) {
  const normalizedColor = color.map(channel => channel / 255)
  const gammaCorrectedRGB = normalizedColor.map(channel =>
    channel <= 0.03928
      ? channel / 12.92
      : Math.pow((channel + 0.055) / 1.055, 2.4)
  )
  const luminance =
    gammaCorrectedRGB[0] * 0.2126 +
    gammaCorrectedRGB[1] * 0.7152 +
    gammaCorrectedRGB[2] * 0.0722
  return luminance
}
You can totally skip this little explanation but in the simplest terms this is how it works:
- We split our colour up into RGB channels by looping through the array and working on one channel at a time.
- Normalise those channels between 0 and 1. Wait, didn’t we just write something to undo this? Well, yes. For complicated reasons involving rounding we would have to do this anyway. 🤫
- Check if each normalised value is below or above 0.03928. This number has something to do with the sRGB colour space gamma threshold (whatever that means). If the number is below we divide the value by 12.92. If it is above we add 0.55, divide by 1.055 and then multiply the result by a power of 2.4.
- After that, each channel gets multiplied by a specific value.
Red * 0.2126, G * 0.7152, B* 0.0722 - Lastly we add all the channels together to produce a relative luminance value between 0 and 1.
☯️ Correcting Contrast
We also need to adjust our calculateContrast() function slightly. At the moment it will only work if the luminance value of the foreground colour is larger than the luminance value of the background.
But of course the contrast between two colours is the same no matter which way round they are. Lets update the function like this:
function calculateContrast(foreground, alpha, backgound) {
  const foregroundLuminance = calculateLuminance(foreground) + 0.05
  const backgroundLuminance = calculateLuminance(backgound) + 0.05
  let contrast = foregroundLuminance / backgroundLuminance
  if (backgroundLuminance > foregroundLuminance) {
    contrast = 1 / contrast
  }
  // round to two decimal places
  contrast = Math.floor(contrast * 100) / 100
  return contrast
}
We are doing a little check to see if this happens and correct the result if it does. Lastly we add 0.05 to each luminance value, as per the formula, and round the contrast result to two decimal places.
Now head back to Figma and test if it’s working. One way to test it out is to set up a bunch of rectangles in Figma and check their contrast in an online contrast checker. Then run through and double check with our plugin to make sure we are getting the same results.
💅 Converting RGB to Hex
At the moment the colours sent to our UI are still in a normalised RGB format. This is a little difficult to read and we also know that eventually we want the UI to show the hex code of the selected colours. So we are going to convert them with a function like so:
function convertRgbToHex(color) {
  const { r, g, b } = color
  const hex = [r, g, b]
    .map(col => {
      const hexColor = normalizedColor.toString(16)
      return `0${hexColor}`.slice(-2)
    })
    .join('')
  return `#${hex}`
}
I am not going to explain how this works, mainly because I haven’t spent time bothering to figure it out 🤷♂️.
Then in the sendContrastInfo() function we pass the converted colours to the UI like this:
function sendContrastInfo(contrast, foregroundColor, backgroundColor) {
  figma.ui.postMessage({
    type: 'selectionChange',
    foreground: convertRgbToHex(foregroundColor),
    background: convertRgbToHex(backgroundColor),
    contrast,
  })
}
💯 Calculating a Score
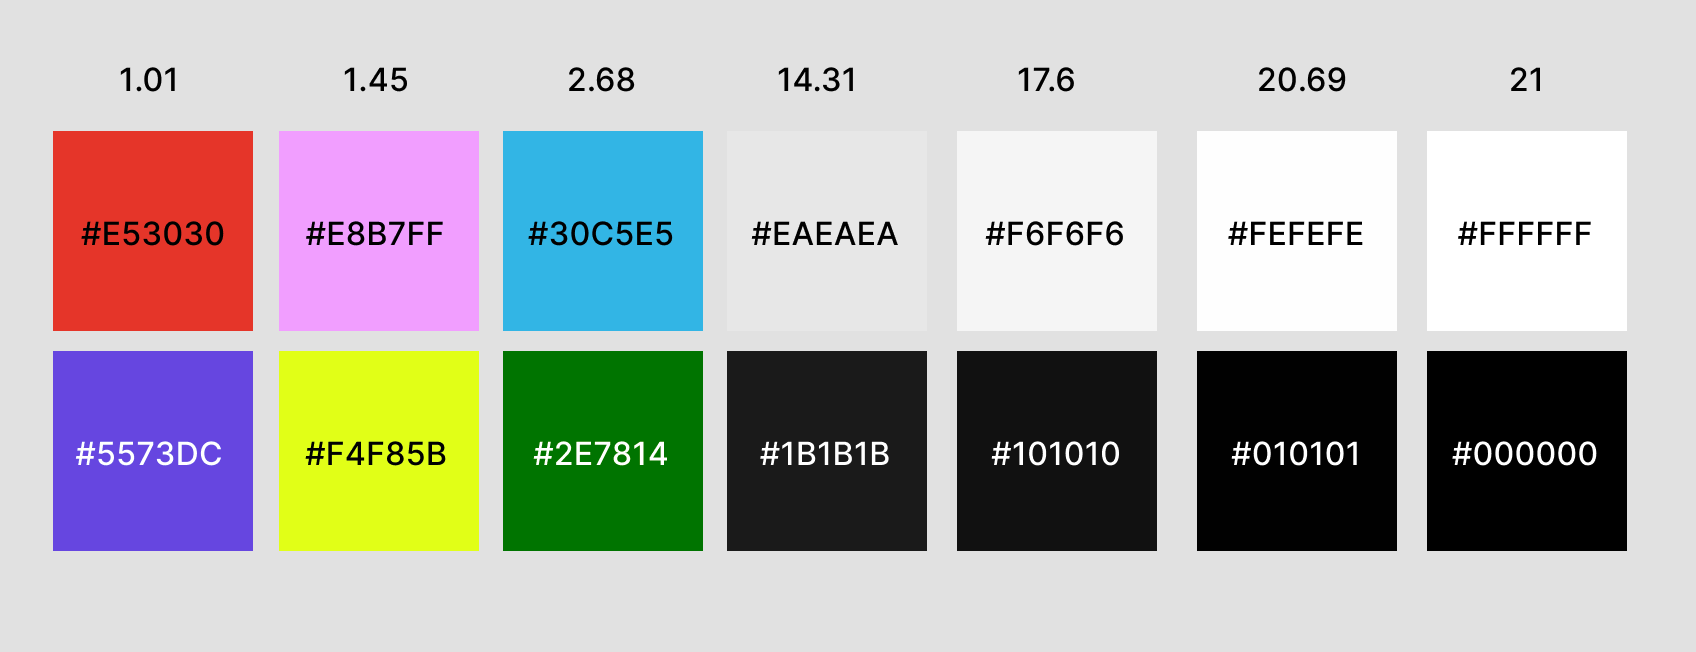
Another piece of information that is missing is what the WCAG contrast score is. If you read the WCAG guide they outline three different grades of contrast:
- ✅ ✅
AAA: A contrast ratio of 4.5:1 or higher for text over 18pt. Or a contrast ratio of 7:1 or higher for text under 18pt. - ✅
AA: A contrast ratio of 3:1 or higher for text over 18pt. Or a contrast ratio of 4.5:1 or higher for text under 18pt. - 🆘
FAIL: A contrast ratio of under 3:1 for text over 18pt. Or a contrast ratio of under 4.5:1 for text under 18pt.
We need to encapsulate this scoring logic in a function so that we can send the correct score along with every message:
function getContrastScores(contrast) {
  let largeText
  let normalText
  switch (true) {
    case contrast > 7:
      largeText = 'AAA'
      normalText = 'AAA'
      break
    case contrast > 4.5:
      largeText = 'AAA'
      normalText = 'AA'
      break
    case contrast > 3:
      largeText = 'AA'
      normalText = 'FAIL'
      break
    default:
      largeText = 'FAIL'
      normalText = 'FAIL'
      break
  }
  return { largeText, normalText }
}
Here we are switching on the contrast parameter value and updating the scores depending on which bracket it falls into. It’s important to put the highest values first otherwise you’ll get some unexpected results. It’s also worth noting that we return the scores in an object.
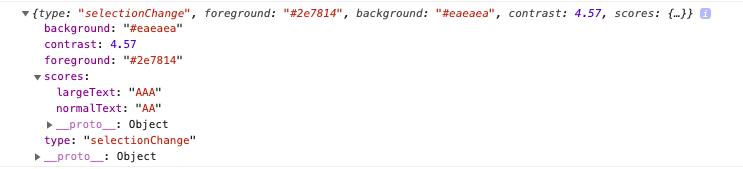
Update sendContrastInfo() to send the scores like so:
function sendContrastInfo(contrast, foreground, background) {
  figma.ui.postMessage({
    type: 'selectionChange',
    foreground: convertRgbToHex(foreground),
    background: convertRgbToHex(background),
    contrast,
    scores: getContrastScores(contrast),
  })
}
Now we should see the scores object logged in Figma if we test our plugin:
👻 Handling Opacity
Up until now we have been dealing with the happy path of comparing two solid colours against each other but there is one edge case I’d like to deal with: opacity. This will complicate our plugin slightly but I think it makes the user experience a lot better.
To calculate contrast with opacity we have to make a new solid colour by blending the two colours like so:
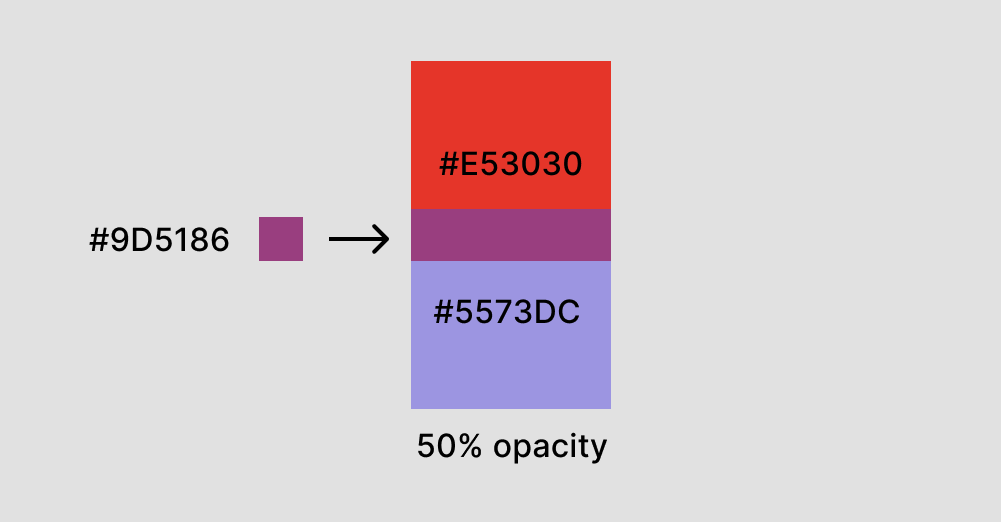
We then calculate the contrast between this new foreground colour (#9D5186) and the background colour (#E53030). The problem is if the background has opacity we can’t determine what colour is behind it to know what new colour to make. This means we can only reliably calculate the contrast if the opacity is on the foreground colour.
So for our purposes we are only going to check if the foreground colour has opacity. This is fine because in 90% of cases this is what people want to check and in the other 10% we just fall back to solid colours. We are also going to add a swap function so that users can swap between foreground and background easily.
The first step towards handling this is by writing an overlay() function that takes the two colours we want to blend and the opacity we will use to blend them.
function overlay(foreground, alpha, backgound) {
  const overlaid = foreground.map((channel, i) =>
    Math.round(channel * alpha + backgound[i] * (1 - alpha))
  )
  return overlaid
}
So what is happening here? Well we are blending the two colours in specific proportions using the alpha value to figure out those proportions. Lets walk through it channel by channel:
- Let’s say our
redchannel value was255and the alpha was 80% or0.8. We get 80% of the red value like this:255 * 0.8 = 204. - Next we take the
redchannel of the background colour, let’s say it is180, and get the remaining 20% like this:180 * 0.2 = 36. - We then add those two together to get the new
redvalue of240. The result of all of this is we end up with a solid colour that is 80% foreground and 20% background.
In the calculateContrast() function we do a check to see if the opacity on the foreground colour is less than 1 (100% opacity) and if it is we call overlay() to produce a new colour and assign it to the foreground:
function calculateContrast(foreground, alpha, backgound) {
  if (alpha < 1) {
    foreground = overlay(foreground, alpha, backgound)
  }
  const foregroundLuminance = calculateLuminance(foreground) + 0.05
  const backgroundLuminance = calculateLuminance(backgound) + 0.05
  let contrast = foregroundLuminance / backgroundLuminance
  if (backgroundLuminance > foregroundLuminance) {
    contrast = 1 / contrast
  }
//...
But where is the alpha coming from? We need to get it when the selection changes and assign it to another global variable so swapping foreground and background will be easier later:
let foregroundColor
let foregroundAlpha
//...
// selecton listener
foregroundColor = getRGB(fills[0].color)
foregroundAlpha = fills[0].opacity
backgoundColor = getRGB(fills[1].color)
const contrast = calculateContrast(
  foregroundColor,
  foregroundAlpha,
  backgoundColor
)
//...
Okay, so that is most of the functionality we need behind the scenes. In the next chapter we will work on displaying information in the UI.

