- Part 1: Understanding the API.
- Part 2: Setting up a server.
- Part 3: Setting up Figma.
- Part 4: Making a request.
- Part 5: Processing the response. 👈 You are here
- Part 6: Setting up a front-end.
- Part 7: Finishing up.
You can find the code for this tutorial here.
In Part 4, we managed to get our server to talk to a Figma endpoint and dump the results. Now we need to process the results and make a query to a different Figma endpoint to get the images we need.
Filtering out all the crap
Going back to our Figma file quickly, we just have 4 frames, each of which has a card symbol and a button group:
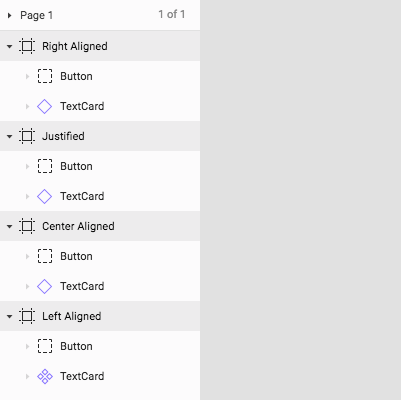
All we want to get for the purpose of this tutorial is those 4 frames. So how do we filter out all the other crap?
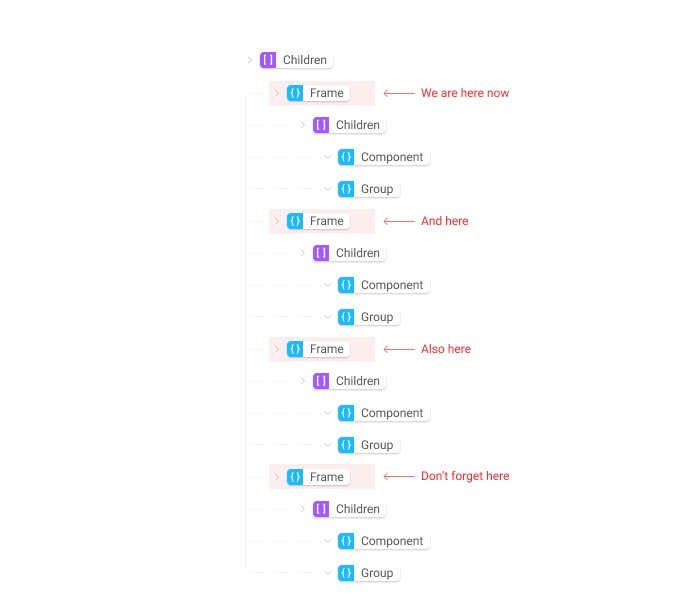
Before we can do that we need to look a little bit closer at what the JSON structure looks like. If we boil it down it looks something like this:
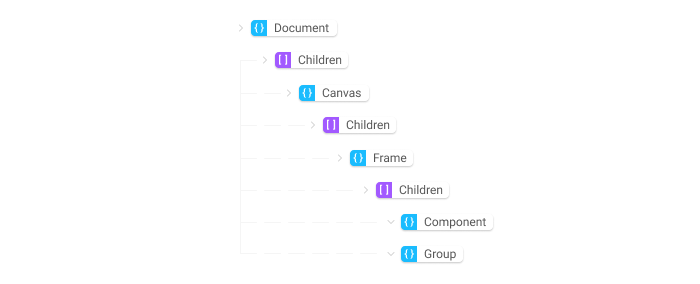
- document
  |- children
     |- canvas
        |- children
           |- frame
           |   |- children
           |       |- component
           |       |- group
           |- frame
           |    |- children
           |       |- component
           |       |- group
           |- frame
           |    |- children
           |       |- component
           |       |- group
           |- frame
           |    |- children
           |       |- component
           |       |- group
Inside the document object there is an array called children that contains all the canvases (our document only has once canvas). The canvas object also contains an array called children that contains all the frames in the document. These frames are what we need.
Okay, now we have a clearer picture of the structure we can change figmaFileFetch() inside server.js to look like this:
async function figmaFileFetch(fileId){
    let result = await fetch('https://api.figma.com/v1/files/' + fileId , {
        method: 'GET',
        headers: {
            'X-Figma-Token': FigmaAPIKey
        }
    })

    let figmaFileStruct = await result.json()

    // add this -->
    let figmaFrames = figmaFileStruct.document.children // 1
        .filter(child => child.type === 'CANVAS')[0].children // 2
        .filter(child => child.type === 'FRAME') // 3
        .map(frame => { // 4
            return {
                name: frame.name,
                id: frame.id
            }
        })

    return figmaFrames
This code is quite confusing at first. Lets break it down:
//1
Our big chunk of JSON is stored infigmaFileStructmuch like before, but now instead of returning that, we create a new variable calledfigmaFramesand make it equal to something.
By declaring a variable on the left side of an=like this, we are assigning its value to whatever is on the right side of the=. In this case we are making it equal to thechildrenarray inside of thedocumentobject that we described in the diagram above.

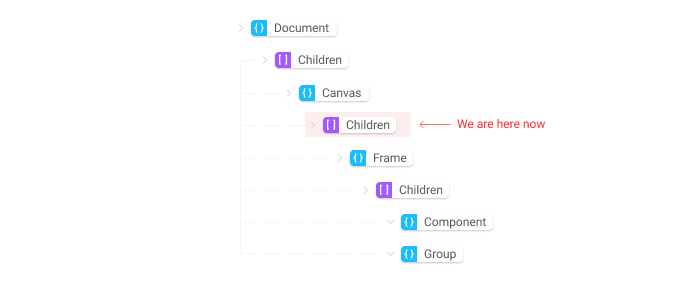
// 2
Before this whole equation can resolve, we are using the.filter()method to find the parts of thechildrenarray we want..filter()is a built in array method that literally filters through each item of an array based on the arguments we give it.
It’s like saying “Hey, go look through that list and make a new list with every item that has the letter p in it!”
In our code we filtering any items that have thetypeofCANVAS. That should give us all the canvases in our doc but we know we only have one. So we use the[0]on the end offilterto access the first child of the array. And.childrento access thechildrenarray inside ourframeobject. In terms of the tree we used before:
//3
Once again, we use.filter(). Remember that filter makes a new array with the results, and doesn’t change the original one. So now we are filtering the array we just created on the line above. This time we want all the items in this array with atypeofFRAME. In our case there are 4 items that match that description — leaving us with an array of 4 frame objects:
//4
Next we use the.map()method. This is another built in array method and it allows us to iterate through an array*.*
This is like saying “Hey, for every item in that list that contains the letter p, make a new list and replace it with the letter d”.
We are using this step to structure the array we are going to return. Instead of the 4 whole frame objects, we only need to know the frame’snameandid.So for every frame object, we make a new simpler object that looks like this{ name: frame.name, id: frame.id }and store them in our array. This is the value that will be passed into ourfigmaFramesvariable and that we return.
If you hit refresh on http://localhost:3001/ you should see something like this:

Getting images from Figma
In Part 1 we discussed that Figma has several endpoints and so far we have only been interacting with one of them. We give it our API Key and a file id and it returns JSON describing the file. The endpoint we need to use next takes our API key, the file id AND the ids of the elements we want to display. It then returns the urls for the images of our frames.
We have everything we need to ask Figma for the image urls, we just need to write some more code:
async function figmaFileFetch(fileId) {
  let result = await fetch('https://api.figma.com/v1/files/' + fileId, {
    method: 'GET',
    headers: {
      'X-Figma-Token': FigmaAPIKey,
    },
  })

  let figmaFileStruct = await result.json()

  let figmaFrames = figmaFileStruct.document.children
    .filter(child => child.type === 'CANVAS')[0]
    .children.filter(child => child.type === 'FRAME')

    .map(frame => {
      return {
        name: frame.name,
        id: frame.id,
      }
    })

  let ids = figmaFrames.map(comp => comp.id).join(',') // 1

  let imageResult = await fetch(
    'https://api.figma.com/v1/images/' + fileId + '?scale=3&ids=' + ids,
    {
      //2
      method: 'GET', //2
      headers: {
        'X-Figma-Token': FigmaAPIKey, //2
      },
    }
  ).catch(error => console.log(error))

  let figmaImages = await imageResult.json() //3

  figmaImages = figmaImages.images //4
  console.log(JSON.stringify(figmaImages)) //4

  return figmaFrames.map(frame => {
    return {
      name: frame.name, //5
      url: figmaImages[frame.id], //5
    }
  })
}
Lets run through this:
- Firstly, we need to have a list of all the ids we want. The Figma endpoint needs these ids to figure out which elements to show. So we create a variable called
idsand use.map()to pull out all the ids in ourfigmaFramesarray. Importantly we use.join()to take all the ids and add them together in a comma separated string ie:123,132,321,231. The ids will be included in our URL so we need them as a string. - You’ll recognise this
fetch()call from earlier — it’s very similar to the one we use for the file endpoint. Just like before, it’s an async call meaning we expect the response to take a while. This time we are constructing a different url:
- Instead of
‘api.figma.com/v1/files/'we need to use‘api.figma.com/v1/images/'as the base of our url. Just like previously we append ourfileId. - The next part of the url,
‘?scale=2&ids=’is a bit confusing, but it includes the scale of the images we want to return. I have hardcoded 2x in there, but you could do your own thing if you want. - Lastly, we add our comma separated list of ids.
The rest is the same as before. We use our API Key to construct a header to authenticate this request against Figma’s servers.
We also add acatch()here to print any errors to the console (we probably should have done this earlier too)
- Here we are parsing the result into JSON, so we can easily work with the data. We are doing this asynchronously because we don’t know for certain that the result has resolved yet.
- This is a bit of a strange line but the response we get from the Figma endpoint has a few other things attached to it. We are only interested in the
imageobject inside of it. Here we make our variable equal to one of its own children objects, essentially throwing away the extra info. - At this point in time our
figmaImagesarray contains objects withidsandurls. We don’t need thoseidsanymore, so before we return the data, we clean it up so that each object has aname:andurl:instead. The frame names aren’t in ourfigmaImagesso we are rather going to update thefigmaFramesarray we have from above. We simply need to swap out the ids with the urls that we have infigmaImagesusing.map(). Now our objects look like this:{“name”:”Left Aligned”, ”url”:”https://reallylongurl"}.
And that’s sort of it. Every time a client goes to that path it will get a response from our server. That response will now be an array with names and urls.
Technically we could end this tutorial here, as we achieved what we set out to do. But it feels like a bit of cop-out to end things here.
In Part 6 we are going to hook up a front-end client to talk to our server and display the image results we get back.