- Part 1: Understanding the API.
- Part 2: Setting up a server. 👈 You are here
- Part 3: Setting up Figma.
- Part 4: Making a request.
- Part 5: Processing the response.
- Part 6: Setting up a front-end.
- Part 7: Finishing up.
You can find the code for this tutorial here.
In Part 1 we went through how the API works and the basic workflow for fetching some elements from a file.
Step 2: Set up a server.
Wait? What? You son of a b*tch, you said this would be easy
a) No, I didn’t.
b) It’s really not that hard.
So what is a server? What used to confuse me about this was thinking that a server is separate computer somewhere, when really that is only true sometimes. More often than not, it is just used to describe an application that serves other applications. We are going to be setting up a server locally, inside your computer.
If you think of a restaurant (it’s no coincidence they are called servers) there is a waiter (server) serving many customers (clients). The waiter takes each customers’ order (request) and then takes that to the kitchen (endpoint). Then when ready, the waiter takes the food (response) back to the customer. In our case, imagine that instead of a finished dish, the kitchen actually gives the waiter all of the cooked ingredients for the dish and the waiter needs to trim it down and assemble it on the plate before serving it to the customer.
Okay, now that we have gone through that lets crack on.
— If you have node and you know how to use the *Terminal, SKIP THIS BIT. —*
Open up the Terminal application. if you are familiar with Terminal, just go ahead and navigate to a folder you want to get started in. If you are new to Terminal, type in
cd Documents+Enterfollowed bymkdir FigmaServerThing+Enterand then finallycd FigmaServerThing+Enter. This will, in most cases create a folder called ‘FigmaServerThing’ inside your ‘Documents’ folder and navigate the Terminal there.
Next click this to download and install Node. Node is a Javascript environment that will allow us to run JS based applications inside of it. It also comes with NPM which will allow us to download and install a bunch of the stuff we need. Once that is installed enter npm init. This will prompt you with a bunch of questions about the project, but you can just hit enter through all of these.
— If you have node and you know how to use the *Terminal, RESUME HERE.—*
Okay, create a new folder somewhere and open it up in your code editor of choice. I’d recommend VSCode if you don’t already have one. Open up the package.json file we created with npm init earlier and replace the contents with:
{
  "name": "FigmaServerThing",
  "version": "1.0.0",
  "description": "bleh",
  "main": "server.js",
  "scripts": {
    "test": "echo \"Error: no test specified\" && exit 1",
    "start": "nodemon server.js"
  },
  "author": "",
  "license": "ISC",
  "dependencies": {
    "create-react-app": "^1.5.2",
    "express": "^4.16.3",
    "express-generator": "^4.16.0",
    "isomorphic-fetch": "^2.2.1",
    "nodemon": "^1.18.3"
  }
}
Once you have done that, hit npm install. This might take a moment.
So what have we just done? We updated the required dependencies for our project by updating the package.json. After we did that we told npm to install all the dependencies listed there. A dependency is just a library of code someone else wrote that we want to use. Our code will depend on that library, so we need to include it. You can sort of think of them like plugins we need to use.
What we installed:
- Express: a super powerful little framework that will enable us to build our server.
- create-react-app: React is a frontend framework, and this is the boilerplate project for that. It has a lot of stuff set up for us.
- isomorphic fetch: Something we need to make requests to the Figma API, we’ll get to this later.
- nodemon: Lets our server refresh our changes without us having to stop and start it whenever we make a change.
Create a file called server.js with the command touch server.js and create a folder called client with mkdir client. Now open up server.js and add the following:
var express = require('express')
var app = express()

app.listen(
  3001,
  console.log("Holy shit, I'm a server and I am listening on port 3001")
)
What’s going on here? Three things:
- First off,
var express = require('express')tells JavaScript that we want to require the express library in order to run this application, and we want to store it in a variable calledexpress. - Secondly
var app = express()creates an instance of express and stores it in the variableapp. Now we have our own instance of express that we use. - Lastly,
app.listen()starts our server and takes two arguments. The first one is the number of the port you want the server to listen on. In our case we chose 3001 — there’s a reason we didn’t use 3000 that we’ll get to later.
The second argument is any callback function you want the server to execute when it starts. In our case we just ask it to print to theconsoleto tell us that it’s listening.
Now, if all goes smoothly, you should be able to run npm start in your terminal and see the following:
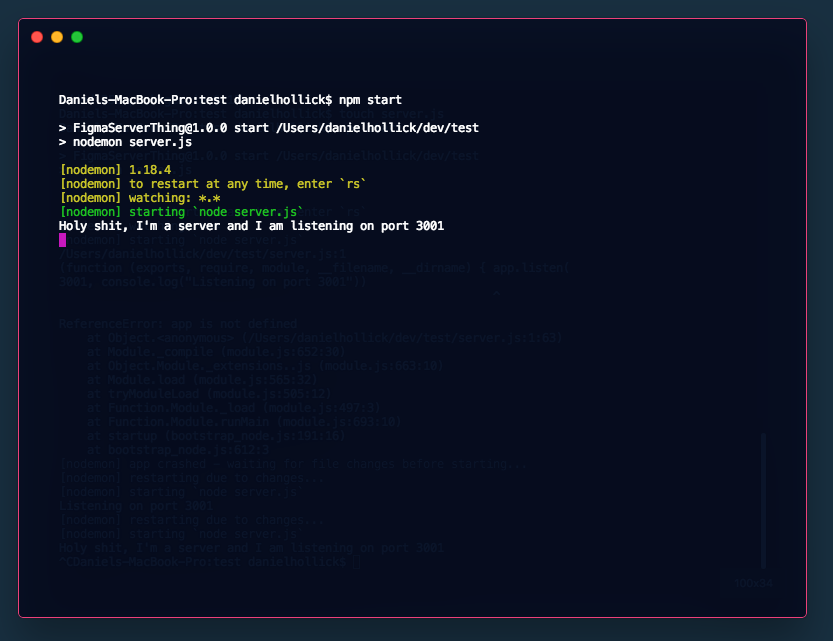
That’s it. That’s a server, you made.
Congratulate yourself, however you see fit, and move on to Part 3 where we are going to start talking to Figma.