In case you haven’t heard, Figma opened up the app for plugin development. I was lucky enough to get in on the beta a few months back and built a plugin I have been thinking about since they hinted at opening up write access.

Dylan Field@zoink
July 9, 2018
@DanHollick @figmadesign We’re also excited
0
0
1
The Plugin.
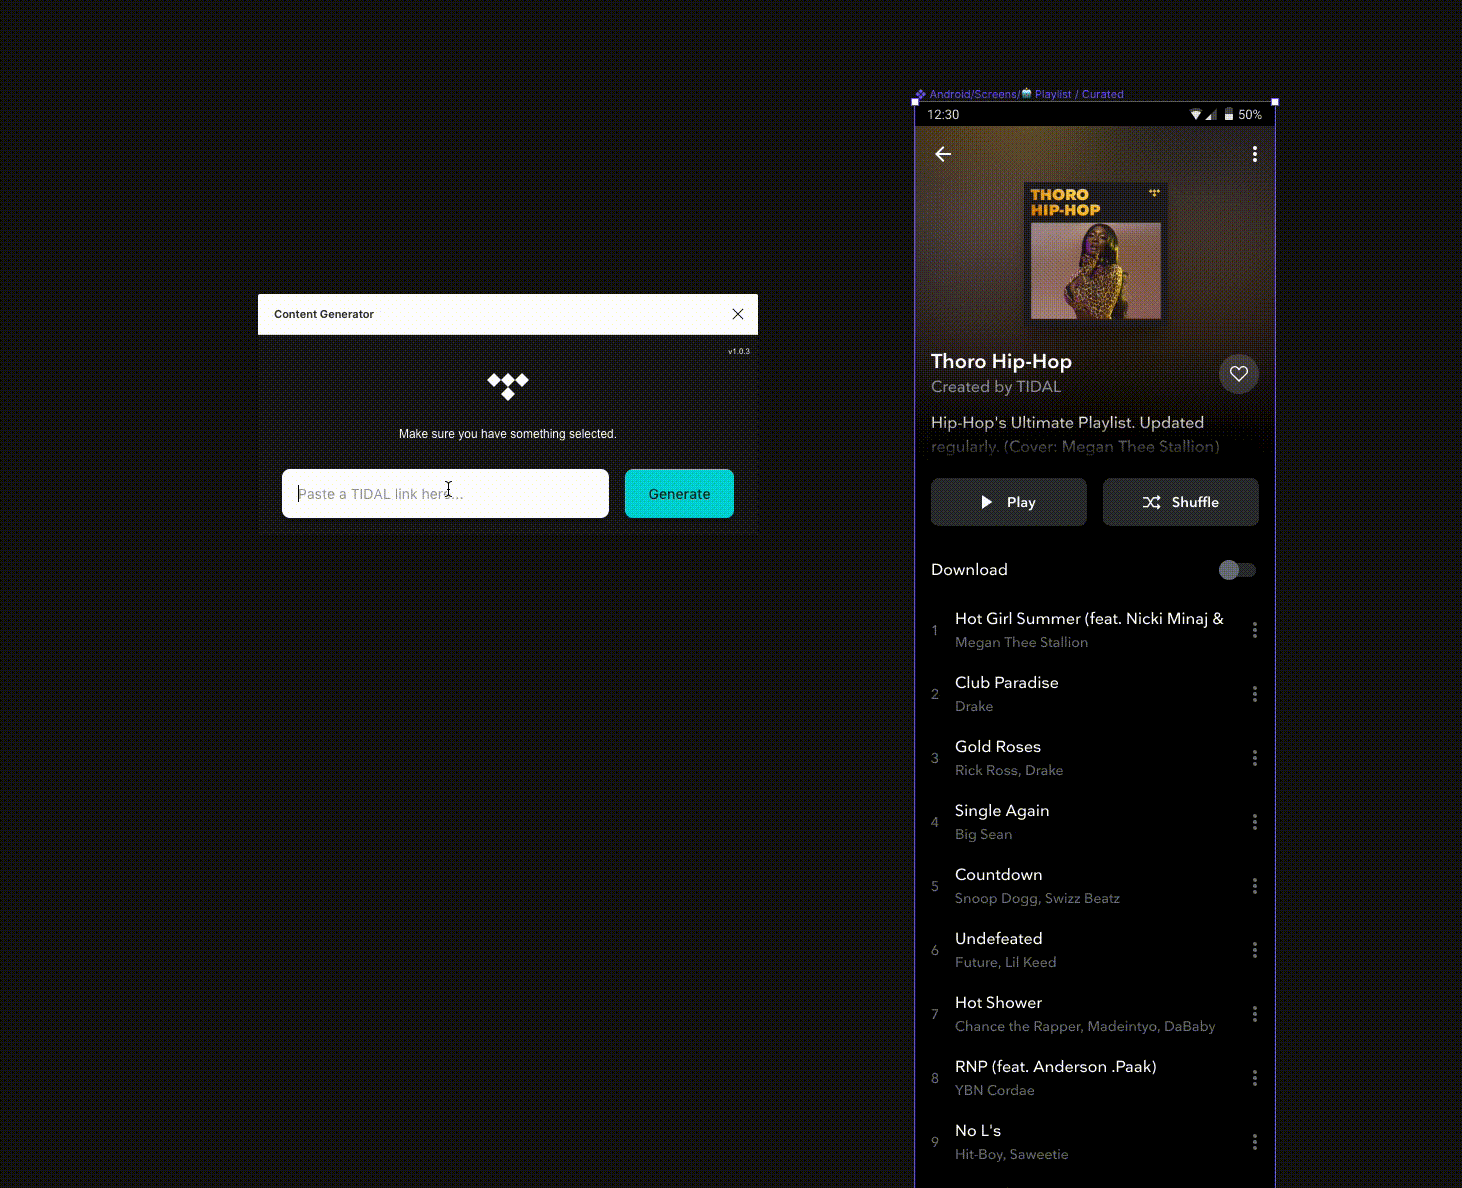
One of the most tedious parts of my job at TIDAL is designing with real data. I know it’s important, I get that. But the amount of hours I have sunk into copying images out of our own app and pasting them into designs is astonishing. Multiply that by every designer, both product and marketing, and you have weeks of wasted time every year.
What makes it particularly painful is that it is data we already have. This is the perfect job for a computer.
So I set about making a plugin that would automate this process by fetching data from our api and populating our designs for us.

Dan Hollick 🇿🇦@DanHollick
August 2, 2019
I built an internal @figmadesign plugin that fetches data from the TIDAL api and populates our designs. A real time saver. https://t.co/aDqhFxL2x9

14
32
373
Design.
I had a couple of pre-requisites for the plugin:
- It needed to be as simple to use as possible. Paste a link, select a frame and go.
- The user shouldn’t have to worry about the details, including how far nested something is or the order of things or the type of content they are pasting.
- It needed to be flexible enough to handle whole pages or individual components.
How it works.
Step 0: Prepping the Figma files.
Before touching code, I needed to make some changes to our Figma files.
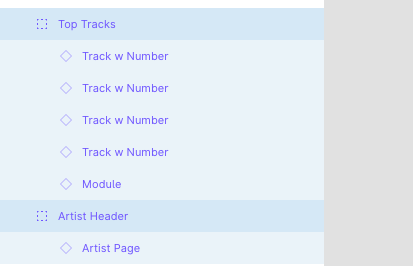
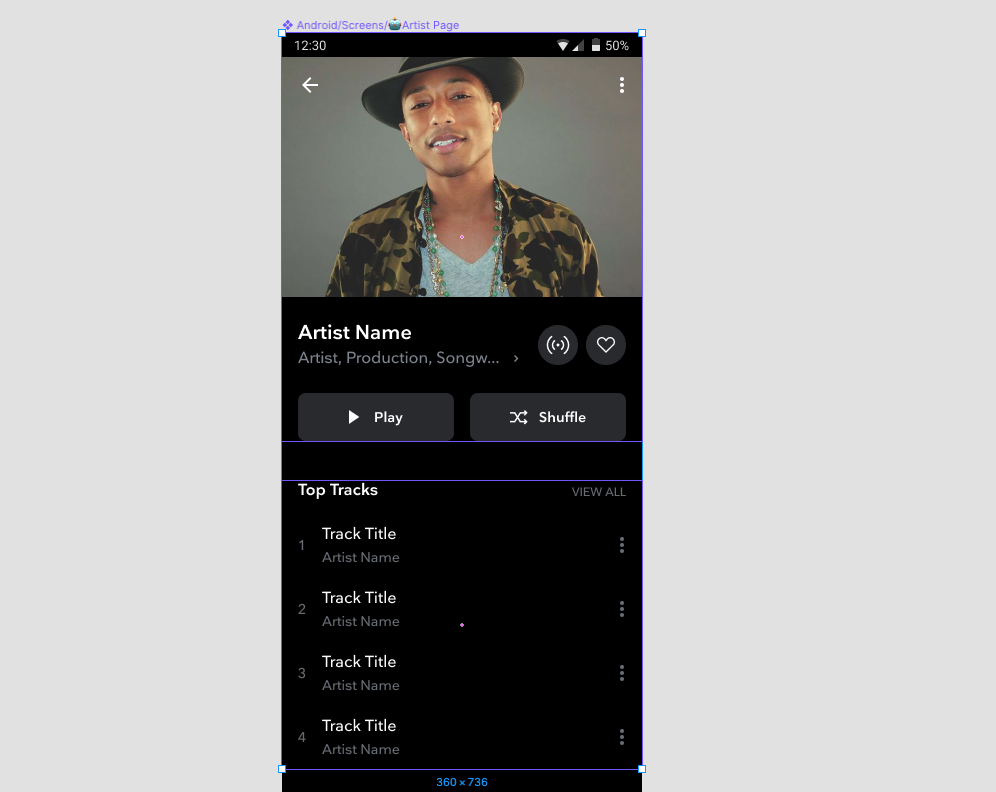
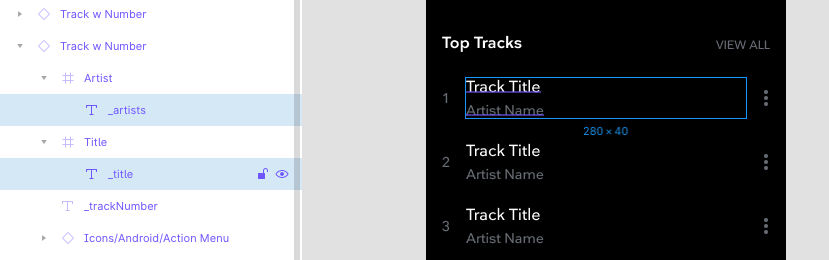
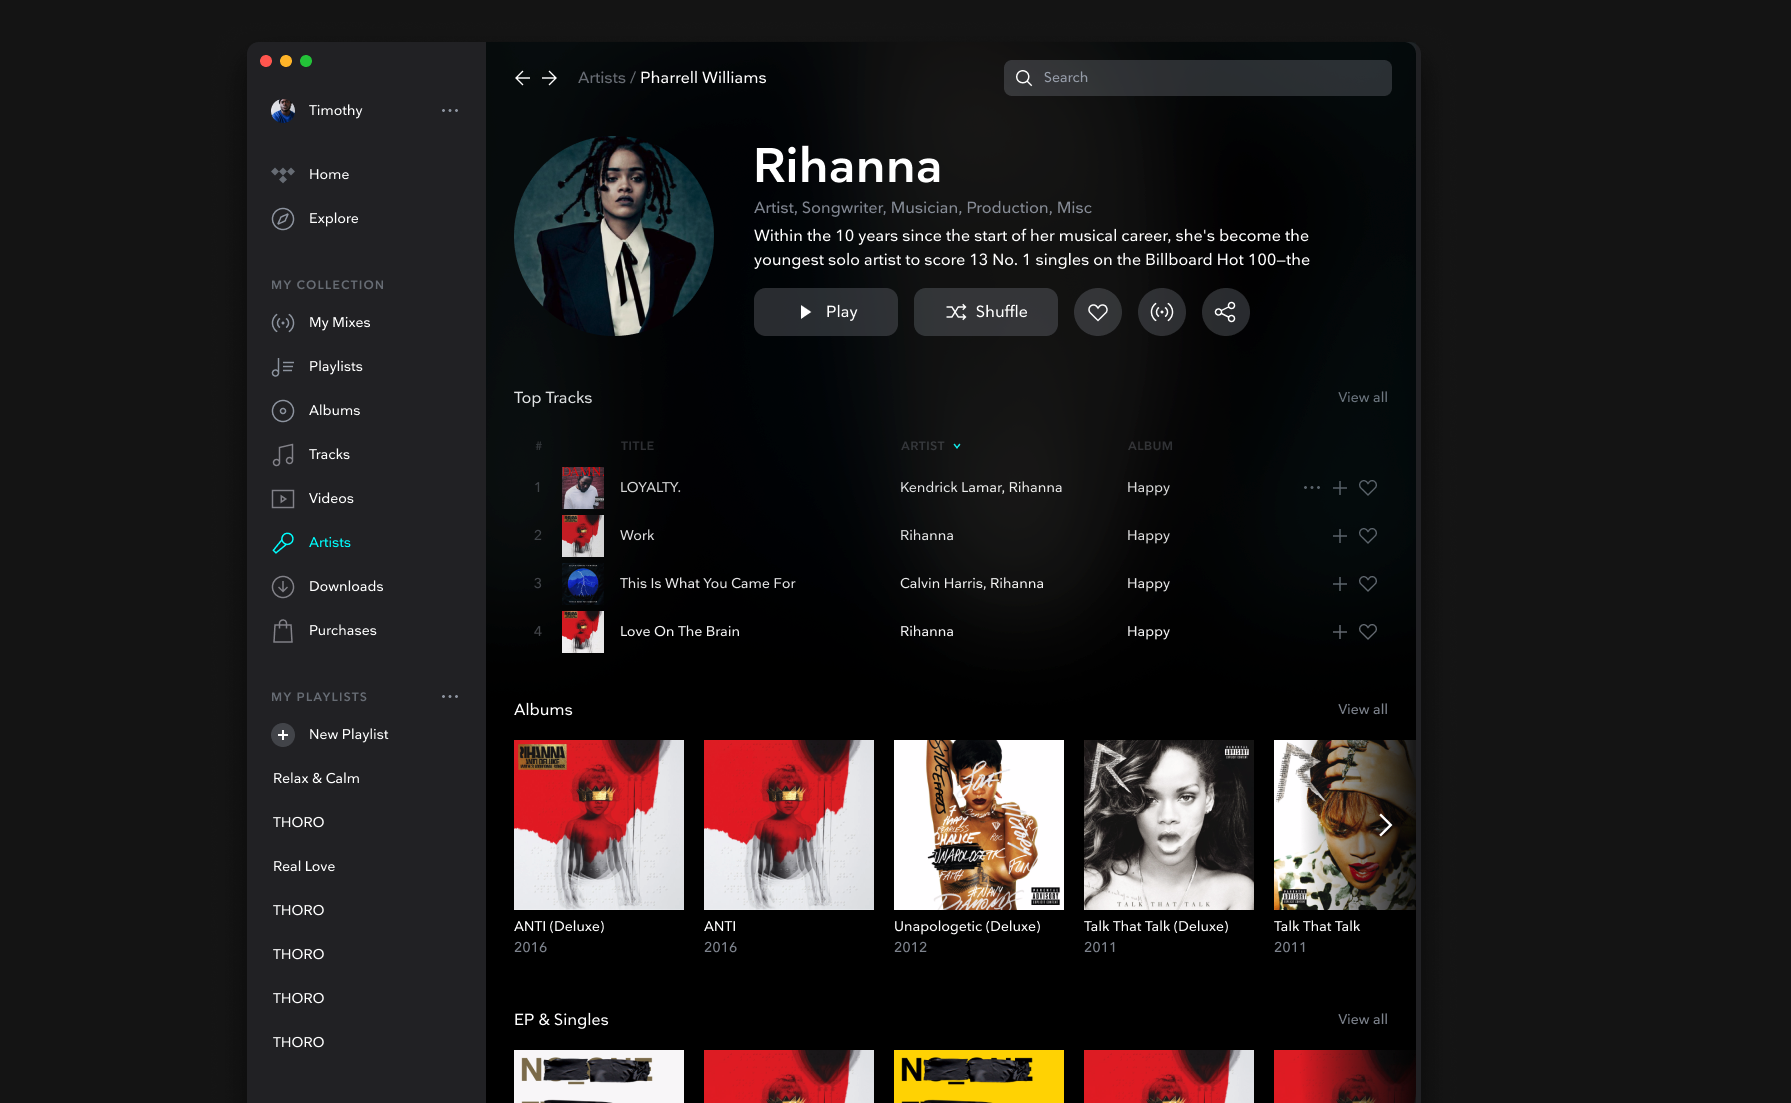
Our pages are structured in modules — with each high level group representing a module. Below you can see an Artist Header module and a Top Tracks module that form an artist page:
This throws up two issues:
- Figuring out which Modules/Groups are eligible for replacement.
- Figuring which layers inside a group to replace with which fields.
For the first one, I settled on matching the layer name to the title of the module in the response. So Top Tracks will be matched with a module in the response that also has the title Top Tracks. Although, slightly fragile, this didn’t require too much effort as our designs already worked like this.
In order to match layers, I decided that using a suffix and a field name, ie: _title, would be more accurate and prevent unintended matches. Because our design system is pretty robust, it’s really just a matter of changing the layer names in the master comps and rolling out the changes.
Step 1: Fetching the data.
Okay so now onto the real nuts and bolts.
One quirk about the way Figma plugins work is you need to message between the little iFrame that your users see (where you can access browser APIs) and the Figma sandbox (where you can manipulate the Figma document).

Our plugin begins by checking the link for the type of content (playlist, album, artist, track…) and making a request to the relevant endpoint. This all happens in the iFrame because we have access to the fetch() api here.
Without going in to too much detail, the api response can differ but generally it contains arrays of modules that are used by our clients to build the page. These modules map pretty perfectly to our design system components, because well… they were designed to.
So now we have data, but a lot of it is not necessary for us.
Step 2: Cleaning the data.
As soon as the fetch() resolves the data is posted to the Figma sandbox and upon receiving it a pruning function is called.
This function is basically a bigswitch() statement but it is super important in creating a uniform interface for designers to think about when using the plugin. I wanted the user experience of the plugin to be as simple as possible so I didn’t want a user to have to think about the quirks of the the api response.
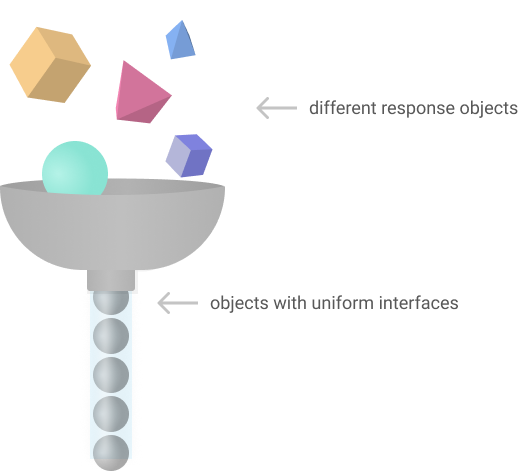
For example, on an artist page, the field that provides the artist name is called something like name and is a string. But on a track it is called artists and is an array of all the artists on the track. This makes perfect sense for the clients, but designers tend not to be that technical. So this function smooths over a lot of the differences and produces a dependable interface so that whenever an artist’s name is what you want, you call the layer _artists and that’s what you will get.
This function also attaches underscores at the beginning of all the fields so that matching fields and layer names is more precise.
Step 3: Finding eligible nodes.
So now, we have our data cleaned, we need to figure out how to get it into the right places in the Figma file.
First, the plugin maps through the currently selected elements and all their children. I found this handy generator function in one of the plugin examples, that will traverse a Figma node tree and yield each node.
function* walkTree(node) {
  yield node
  const { children } = node
  if (children) {
    for (const child of children) {
      yield* walkTree(child)
    }
  }
}
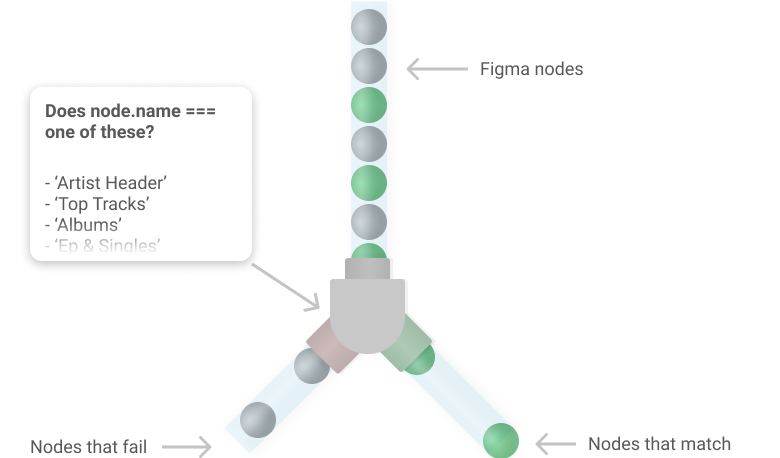
So on each node the plugin does a simple check to see if that node has children (so it’s a group or frame) and if that node’s layer name matches any of the module titles in our API response. If yes, it gets put into an array of nodes that have been marked eligible for processing. Simple.
Step 4: Organising nodes
Okay so, we have a an array of modules with data from the api, and we have an array of Figma nodes that match those module names. We are ready to replace the content.
Using the same generator function, the plugin traverses each Figma node in an eligible module, one by one. This time the plugin checks to see if the node has a type of RECTANGLE ,ELLIPSE or TEXT and if its name matches one of the field names in the corresponding api module.

If a node passes all these checks its content is replaced and the field name, ie: _title, is counted. By keeping track of how many times a field name has occurred I can make sure that content is being added in the correct order.
Essentially this process repeats until the plugin runs out of eligible nodes to replace. During this process the plugin posts messages back to the iFrame to update the status in the UI, and as soon as it has traversed each node it signals that it’s done.
Extra step: Replacing images
Okay, so we aren’t done… unfortunately replacing an image in a node isn’t just as simple as giving it a url and hoping for the best.
The way Figma creates a new image is using raw byte data but all I have is a url. So what can I do?Luckily there is a fairly helpful image example and a guide that helped me to figure this out. Here’s how it works:
So if the node being replaced contains an Image Fill a separate function gets called that asynchronously processes the image, allowing the rest of the process to carry on.
- The first thing this function does is posts the image url back to the iFrame. We need to do this in the iFrame because it has access to the browser APIs which we need to turn an image url into byte data.
- Inside the iFrame we create an invisible
canvas, load the image inside of it and get theimageDatafrom it like so:
if (message.image) {
    const canvas = document.createElement('canvas')
    const ctx = canvas.getContext('2d')
    const art = new Image()
    art.crossOrigin = 'Anonymous'
    art.src = message.url
    art.onload = async () => {
      canvas.width = art.width
      canvas.height = art.height
      ctx.drawImage(art, 0, 0)const imageData = ctx.getImageData(0,    0, art.width, art.height)
    }
- Next we need to pass the Image Data to a handy encoding function, from the above example, which produces the byte data.
const newBytes = await encode(canvas, ctx, imageData)
...
async function encode(canvas, ctx, imageData) {
  ctx.putImageData(imageData, 0, 0)
return new Promise((resolve, reject) => {
    canvas.toBlob(blob => {
      const reader = new FileReader()
      reader.onload = () => resolve(new Uint8Array(reader.result))
      reader.onerror = () => reject(new Error('Could not read from blob'))
      reader.readAsArrayBuffer(blob)
    })
  })
}
- Lastly we send those bytes back to the sandbox and call the
createImage()function in Figma.
I have no idea if this is still the best way to do it. It feels super convoluted and is a tad slow but the performance isn’t that bad relative to doing everything manually.
Hope you enjoyed the rundown. If you found it useful share it around on twitter or clap for it.
I’m working on a more in depth tutorial about making a Figma plugin, so nag me on twitter for that.